Thanks Carlos and Mike! As we are part of the resin generation when it comes to model building we know some resins age and become very brittle! Barracuda Resins are still quite fresh and easy to saw away from their molding blocks. I managed to slice the tips of my fingers during the whittling process; in each case it was more of slight cut but I still had to clean up the blood and wrap band aids on my finger tips to finish. Then I fast glued two parts - seat bracket and seat floor - a solid floor is a concession made by Eduard because the floor is not wood it is the canvas of the aircraft itself; pilot feet go on two wooden paddles for controlling movement. Heaven help you if you lose footing during flight. There’s nothing there but a yard of stretched canvas! Anywho
The good news is there is some real attempt at finer details to add into the cockpit but that simple seat was too weak to keep. I’ve added and centered the resin seat. Polished it and used a sharpened toothpick to add some fine Milliput to areas I don’t think will be seen—but we the modeler see all! Now what remains is to mask the floor and prime the resin. I want that to be a good seal so the paint will adhere properly.
1/48 Eduard Nie.11 N1135 by speedgraflex
-
speedgraflex

- Moderator
- Posts: 11399
- Joined: Fri Feb 10, 2017 11:08 pm
- Contact:
Re: 1/48 Eduard Nie.11 N1135 by SPEEDGRAFLEX
Make more models!
-
Duke Maddog

- Elite Member
- Posts: 7669
- Joined: Tue Jun 03, 2014 11:22 am
- Location: Rowland Heights, CA
Re: 1/48 Eduard Nie.11 N1135 by SPEEDGRAFLEX
For the dried decals, you could always apply a coat of MicroScale Liquid Decal Film to them to seal them. This helps to greatly reduce the chance they shatter or break so that they go on smoothly. MicroScale decal solvent will help to lay them down as the decal film is formulated to react to the Micro Sol.
The Duke
Virtuoso of Miniatures
"Do you know what the chain of command is? It's the chain I get and beat you with 'till you understand who's in ruttin' command!"
-Jayne Cobb, Firefly Episode 2 "The Train Job"
We are modelers - the same in spirit, in hunger to insanely buy newly released kits, hustlers in hiding our stash from our better halves and experts in using garbage as replacements for after-market parts.
Virtuoso of Miniatures
"Do you know what the chain of command is? It's the chain I get and beat you with 'till you understand who's in ruttin' command!"
-Jayne Cobb, Firefly Episode 2 "The Train Job"
We are modelers - the same in spirit, in hunger to insanely buy newly released kits, hustlers in hiding our stash from our better halves and experts in using garbage as replacements for after-market parts.
-
speedgraflex
- Moderator
- Posts: 11399
- Joined: Fri Feb 10, 2017 11:08 pm
- Contact:
Re: 1/48 Eduard Nie.11 N1135 by SPEEDGRAFLEX
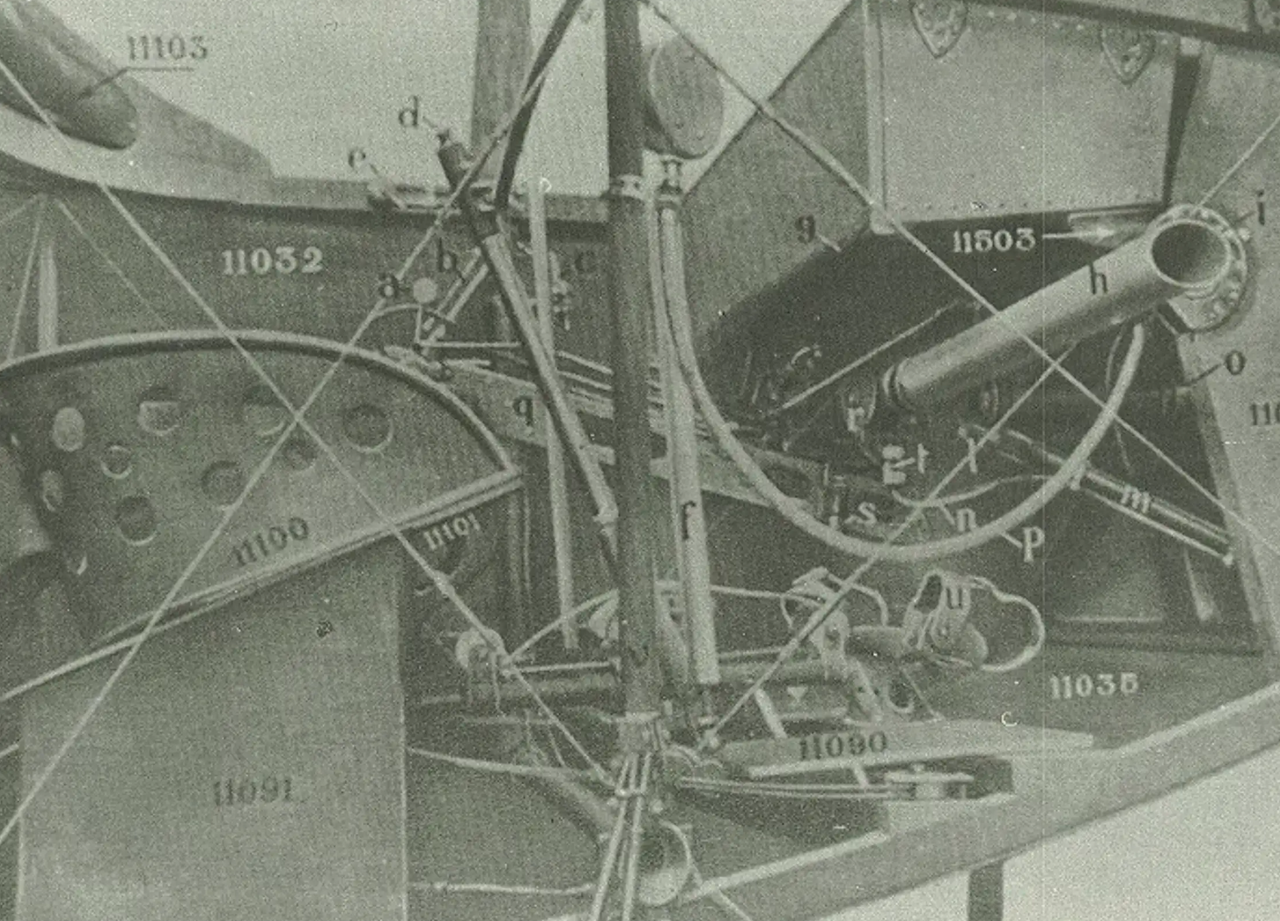
Here you can see the actual cockpit within its nest of cables! The actual wooden seat has been artfully holed out to reduce its weight. This is a feature Eduard has not added to its weekend kit version. P-Pack versions have a better PE seat but I am keeping this project more as a chance to hone my skills, improve myself then to go all out. Removing the back of the resin seat - lowering it to fit the original - and thinning the resin sidewall works for me. I couldn’t see myself drilling holes and bending plastic as fun as that is - to add that feature. Plus, seatbelts and cushion hide those holes! That’s my massive rationalization.
Make more models!
-
speedgraflex
- Moderator
- Posts: 11399
- Joined: Fri Feb 10, 2017 11:08 pm
- Contact:
Re: 1/48 Eduard Nie.11 N1135 by SPEEDGRAFLEX
Duke! Duke! Duke! My thanks to you for the sound advice regarding the decals. I don’t have the sealer film. Is there by chance a home brew for this? My Dad used to paint a clear coat on with a brush like a varnish but those were the days when Monogram was king of the hill and whatever this concoction was I don’t know anymore. He also used white vinegar I think to help snuggle decals. I do have the solvset two pack though so I can practice using a section of decals I’m not going to use for the kit to see what happens. Thoughts??Duke Maddog wrote: ↑Wed Dec 17, 2025 2:30 pm For the dried decals, you could always apply a coat of MicroScale Liquid Decal Film to them to seal them. This helps to greatly reduce the chance they shatter or break so that they go on smoothly. MicroScale decal solvent will help to lay them down as the decal film is formulated to react to the Micro Sol.
Make more models!
-
Gary Brantley

- Elite Member
- Posts: 2749
- Joined: Tue Apr 08, 2014 9:40 pm
- Location: Cameron, Texas
Re: 1/48 Eduard Nie.11 N1135 by SPEEDGRAFLEX
That does work well, Mark!Duke Maddog wrote: ↑Wed Dec 17, 2025 2:30 pm For the dried decals, you could always apply a coat of MicroScale Liquid Decal Film to them to seal them. This helps to greatly reduce the chance they shatter or break so that they go on smoothly. MicroScale decal solvent will help to lay them down as the decal film is formulated to react to the Micro Sol.
 I've had great success using it to save some really old decals.
-
speedgraflex
- Moderator
- Posts: 11399
- Joined: Fri Feb 10, 2017 11:08 pm
- Contact:
Re: 1/48 Eduard Nie.11 N1135 by SPEEDGRAFLEX
Thanks, Gary, for that seconding! I’ll look into what liquid decal is in the future. I’m not sure everyone is aware of this, but I’m doing this on a strict budget. If I don’t already have it in my supplies, I’m not buying anything new.
I’m also returning to a forum that I personally truly care about. One reason I joined here was to pick up where I left off after I stopped model building; I believe that applies in whole or in part to many here. Approaching midlife, there is an increased need to plug into something personal; I’m still looking forward as I believe we all should be looking forward to projects we want to make. Being part of a forum is a sanctuary for the dreams of dreamers.
Why do people come and go? I think the reasons are for love or for money although I try to be careful when making general statements. I left for both, but I have seen cases of one or the other. Being a small forum, we tend to really feel when someone leaves. This isn’t the smallest group I joined; that honor goes to the group dedicated to building the EVA pod from 2001: A Space Odyssey. I think there were about 15 souls on board in that case. Total.
The spam exodus three years or was it four was not something that has affected my work or attitude, but I miss those who left. I also respect everyone who keeps a foot in both forums. That’s impressive to me. I tried doing this but found my heart wasn’t in the other forum. Again, the love wasn’t there for me. I did try, with reservations and respect, to change to another forum, but I found it wasn’t good for me. I don’t need the things the other forum offered me; I had trouble navigating through its subtopics. I found myself isolated in science fiction only, which I dearly enjoy but it wasn’t what brought me to Spam nor is it what keeps me here—
You do. That and simpler navigation, emphasis on model building and not self-promotion.
I’m also returning to a forum that I personally truly care about. One reason I joined here was to pick up where I left off after I stopped model building; I believe that applies in whole or in part to many here. Approaching midlife, there is an increased need to plug into something personal; I’m still looking forward as I believe we all should be looking forward to projects we want to make. Being part of a forum is a sanctuary for the dreams of dreamers.
Why do people come and go? I think the reasons are for love or for money although I try to be careful when making general statements. I left for both, but I have seen cases of one or the other. Being a small forum, we tend to really feel when someone leaves. This isn’t the smallest group I joined; that honor goes to the group dedicated to building the EVA pod from 2001: A Space Odyssey. I think there were about 15 souls on board in that case. Total.
The spam exodus three years or was it four was not something that has affected my work or attitude, but I miss those who left. I also respect everyone who keeps a foot in both forums. That’s impressive to me. I tried doing this but found my heart wasn’t in the other forum. Again, the love wasn’t there for me. I did try, with reservations and respect, to change to another forum, but I found it wasn’t good for me. I don’t need the things the other forum offered me; I had trouble navigating through its subtopics. I found myself isolated in science fiction only, which I dearly enjoy but it wasn’t what brought me to Spam nor is it what keeps me here—
You do. That and simpler navigation, emphasis on model building and not self-promotion.
Make more models!
-
Stikpusher

- Moderator
- Posts: 21224
- Joined: Sat Apr 05, 2014 8:37 pm
- Location: Ceti Alpha 5
Re: 1/48 Eduard Nie.11 N1135 by SPEEDGRAFLEX
speedgraflex wrote: ↑Wed Dec 17, 2025 2:24 pm a solid floor is a concession made by Eduard because the floor is not wood it is the canvas of the aircraft itself; pilot feet go on two wooden paddles for controlling movement. Heaven help you if you lose footing during flight. There’s nothing there but a yard of stretched canvas!
Bruce, if you look in the photo, at the end of the foot troughs are the rudder pedals, Actually stirrups would be a better name for them as they have straps that go over the top of the pilots boots to keep them in the proper position at all times. The top straps on rudder pedals are pretty common on older aircraft.
On a related note, stretched linen is what the fabric of the aircraft is usually made from. Stiffened with dope of course. Canvas is too heavy, and with those old aircraft, every bit of weight counts.
"Surely I have made my meaning plain? I intend to avenge myself upon you, Admiral. I have deprived your ship of power, and when I swing 'round, I intend to deprive you of your life."
FLSM
FLSM
-
speedgraflex
- Moderator
- Posts: 11399
- Joined: Fri Feb 10, 2017 11:08 pm
- Contact:
Re: 1/48 Eduard Nie.11 N1135 by SPEEDGRAFLEX
Thanks, Carlos! I really needed the explanation because now I can see that there are pedals or stirrups which is a great word choice above what look like two rectangular planks again to save weight. And coincidentally last night I did some spray color tests and I am going to white base coat the aircraft which certainly is more accurate to the color of linen. I really appreciate that you took the time to explain everything so clearly.
I also found a video online of a fella building the same kit which basically was like watching a very straightforward build, ending in a decent model. I didn’t agree with the painting approach but it was illuminating to see the rigging work mainly. Again I didn’t agree with the use of spun wire turnbuckles but that’s certainly one way to get the job done. I’m still not sure what’s best but I will need to drill out holes in the fuselage and tail wings to accommodate rigging of any kind.
I also found a video online of a fella building the same kit which basically was like watching a very straightforward build, ending in a decent model. I didn’t agree with the painting approach but it was illuminating to see the rigging work mainly. Again I didn’t agree with the use of spun wire turnbuckles but that’s certainly one way to get the job done. I’m still not sure what’s best but I will need to drill out holes in the fuselage and tail wings to accommodate rigging of any kind.
Make more models!
-
Stikpusher
- Moderator
- Posts: 21224
- Joined: Sat Apr 05, 2014 8:37 pm
- Location: Ceti Alpha 5
Re: 1/48 Eduard Nie.11 N1135 by SPEEDGRAFLEX
Anytime Bruce! Yeah, using a white or an off white is a great starting point for the doped linen base color. Pre drilling the holes for rigging is a good idea as well. Turnbuckles? I know a guy who used sewing needles for those before companies like Gas Patch came along. But for a frugal home made work around, using wire sounds like a great method. Personally I have skipped them so far and just use music wire for rigging, .010” or smaller.speedgraflex wrote: ↑Thu Dec 18, 2025 11:26 am Thanks, Carlos! I really needed the explanation because now I can see that there are pedals or stirrups which is a great word choice above what look like two rectangular planks again to save weight. And coincidentally last night I did some spray color tests and I am going to white base coat the aircraft which certainly is more accurate to the color of linen. I really appreciate that you took the time to explain everything so clearly.
I also found a video online of a fella building the same kit which basically was like watching a very straightforward build, ending in a decent model. I didn’t agree with the painting approach but it was illuminating to see the rigging work mainly. Again I didn’t agree with the use of spun wire turnbuckles but that’s certainly one way to get the job done. I’m still not sure what’s best but I will need to drill out holes in the fuselage and tail wings to accommodate rigging of any kind.
"Surely I have made my meaning plain? I intend to avenge myself upon you, Admiral. I have deprived your ship of power, and when I swing 'round, I intend to deprive you of your life."
FLSM
FLSM
-
speedgraflex
- Moderator
- Posts: 11399
- Joined: Fri Feb 10, 2017 11:08 pm
- Contact:
Re: 1/48 Eduard Nie.11 N1135 by SPEEDGRAFLEX
Gas Patch charges a premium and the last time I bought a pair of Vickers from them the molds weren’t that impressive. I like the idea of wire the best so far, but cutting needles is pretty cool. There’s an inbetweener buckle-cable tensioner thingie that I was thinking about making with short sections of stretched sprue. Stretching sprue is one aspect of our hobby I’ve never quite mastered. I see fellas stretching near perfect lengths every time but I seem to get one end thick and the other fat. It’s one of those weirdly important tasks most modelers master early on, which I can’t quite get. I wanted to visit the Duke on one of his Hobby Days to get some practice time with a professional!
I did take advantage of SoCal’s summery winter weather to set up my airbrush on the balcony and knock out some tests using the 1500 Mr. Surfacer I use in white. The other thing I’ve forgotten is to wear gloves! Wow. At least I washed and dried the unpainted plastic overnight. My main goal was to get a coat of primer on the resin seat to protect it as I moved into assembly. Also it was time to cut the fuselage halves and test fit what Eduard designed as a base platform. I might scrape away the semicircular foot pads at least, attempting to better conform kit with actual aircraft cockpit. I must resist the temptation to go too far. I’ve been there and burned out before too.
I did take advantage of SoCal’s summery winter weather to set up my airbrush on the balcony and knock out some tests using the 1500 Mr. Surfacer I use in white. The other thing I’ve forgotten is to wear gloves! Wow. At least I washed and dried the unpainted plastic overnight. My main goal was to get a coat of primer on the resin seat to protect it as I moved into assembly. Also it was time to cut the fuselage halves and test fit what Eduard designed as a base platform. I might scrape away the semicircular foot pads at least, attempting to better conform kit with actual aircraft cockpit. I must resist the temptation to go too far. I’ve been there and burned out before too.
Make more models!